Jewellery tutorial - how to make a simple necklace
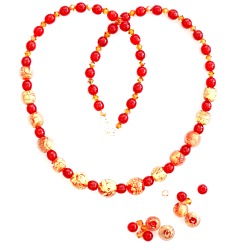
I've called this necklace Golden Embers because of the lovely, warming mix of red and gold.
This is a very quick and easy necklace project, the longest part is probably choosing and arranging the beads, but then I always find that part the most fun.
Necklace Ingredients
- A selection of beads
- A clasp
- A jump ring
- Two crimp beads
- 20 inches of beading wire
- Chain nose pliers or crimping pliers
If you are not sure what any of these items are please have a look through our jewellery making glossary.
Necklace Instructions
Picture 1 - the necklace design
Gather your beads together and decide on a design for your necklace.
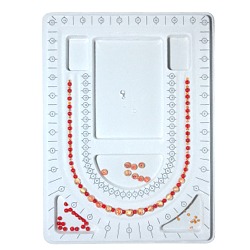
This is where a bead board can come in useful (see picture 1).
If you don't have a bead board arranging your beads on a bead mat, piece of felt or a soft cloth allows you to play around with your design until you are happy with it.
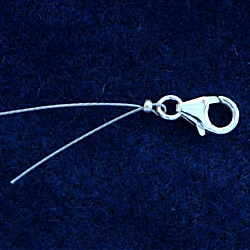
Picture 2 - attach your clasp to the beading wire
Cut a length of beading wire approximately 8cm longer than the finished length of your necklace. Thread on your chosen clasp.
Position the clasp about 4cm from the end of the beading wire and then pass a crimp bead over both ends of the wire (see picture 2).
Using crimping pliers or chain nose pliers flatten the crimp bead to hold the wire in place. This is known as crimping the crimp bead.
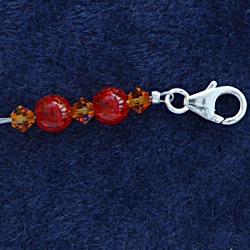
Picture 3 - string your beads onto the beading wire
String your beads onto both pieces of beading wire, so that the shorter end is completely covered by the beads (see figure 3).
Following your design, carry on stringing your beads until you have 4cm of beading wire left.
Picture 4 - string the other end of your clasp
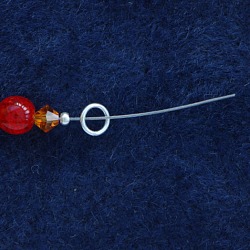
String the other crimp bead followed by the jump ring onto the beading wire (see picture 4).

Picture 5 - pass the wire back through the crimp bead
Pass the wire back through the crimp bead and the last beads strung. Pull Snug. Using crimping pliers, or chain nose pliers, flatten the crimp bead as before (see picture 5).
That's it, your necklace is now ready to wear.
Picture 6 - the finished necklace
Some Final Notes
You can string all your beads onto the wire and then add the clasp on each end. This can be a useful technique if you want to play around with the length of your necklace before committing yourself to attaching the clasp. However, I find I am less likely to lose all my beads off the other end of the wire, if I attach one end of the clasp first.
To make the crimp bead less obvious you can add a spacer bead between the crimp bead and the clasp. However it can make it a little trickier to crimp the crimp bead as it will be sandwiched between two other beads.